
Logo
Upload a custom logo for the site template.
Uploading a custom logo in your Joomla 3.0 hosted website is straight forward, and you can see in the screenshots below how the logo will show in the upper left of your pages:
| Senza logo | con logo |
|---|---|
|
|
|
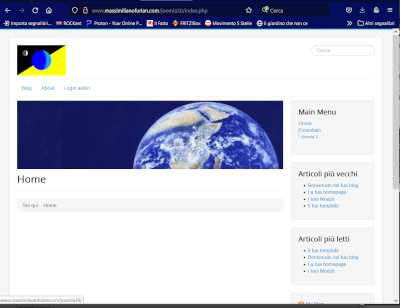
You’ll notice that if you choose to show a custom logo, your site title will no longer show. In our testing, you can see the My Joomla 3.0 Website title shows in the before screenshot, but not in the after.
To add a logo in Joomla 3.0
- Log into your Joomla 3.0 Admin Dashboard
- In the top menu, click Extensions and then click Template Manager
- In the list of templates, find and click on the Protostar template. In our testing, we clicked on My Default Style (Protostar)
- Click the Options (or Advanced if you don’t see Options) tab towards the top of the page
- Find the setting labeled Logo, and then click the Select button next to it.
-
At this point you have several options:
6.1: Browse through files you’ve already uploaded and click on an image
6.2: Next to Image URL, type in the url to the image
6.3: Next to Upload file, click Choose Files and then upload a logo from your computerAfter using one of the three options above, click the Insert button in the top right of the pop-up and then click the Save button in the top left of the page to save the settings for you new logo.
A note about File size:
Joomla will show you the file size limit if you decided to upload a file. For example, we saw at message stating there was a 10mb limit. As far as dimenions, we were allowed to upload an image 2000px long. The chrome browser resized the long image so it didn’t stretch off the screen, but Firefox showed the full 2000px wide image (which didn’t look good at all).